BlendLuxCore Installation
Note: This version of the guide is valid as of Blender 4.2 LTS and BlendLuxCore v2.10. If you notice any incompatibilities with later versions, please inform the developers thorugh one of the community channels.
The guide to install legacy versions can be found on the page BlendLuxCore Installation (legacy)
Downloading
- Visit the download page to find the latest release versions.
- download the zip archive for one of the latest versions.
- Older versions of BlendLuxCore can be found on the GitHub releases page.
Installation
Follow the official Blender instructions for installing an extension. Follow the steps for "Install from Disk":
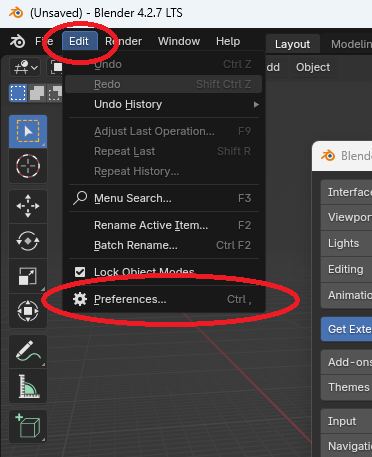
- Open up the preferences menu: "Edit" -> "Preferences" (first picture)
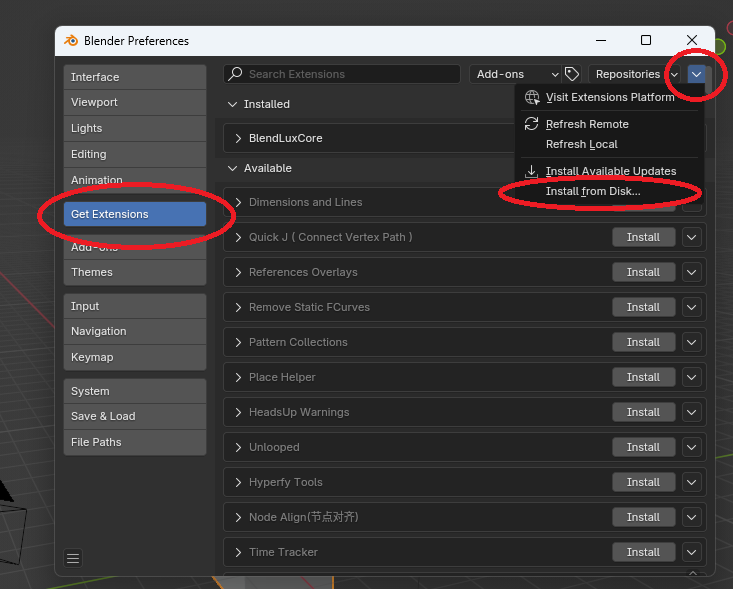
- Go to the "Get Extensions" tab (second picture)
- Open the menu in the top right corner and select "Install from disk..." (second picture)
- Select the zip archive.
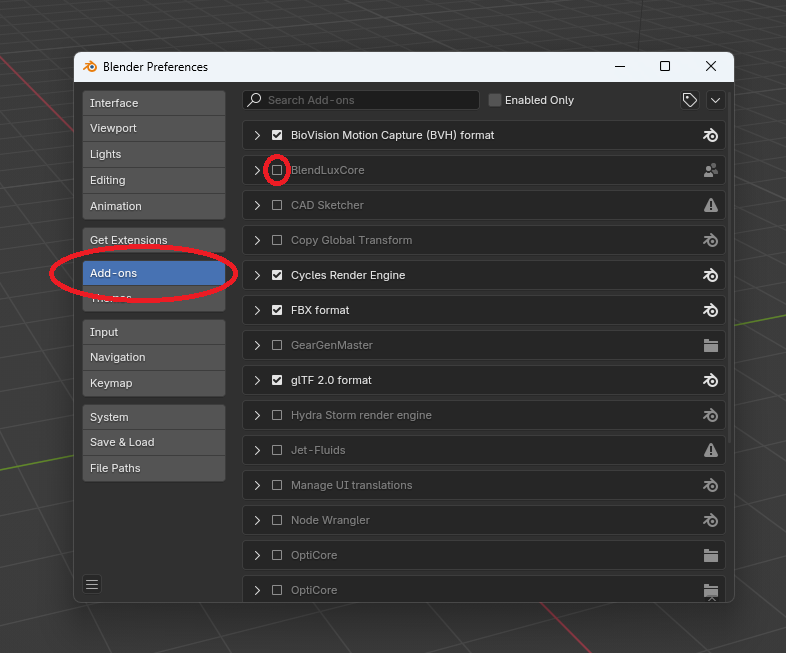
- After the installation, BlendLuxCore should automatically be activated. You can verify this in the "Add-ons" tab.
- It is recommended to restart Blender before using BlendLuxCore, to ensure all features are loaded correctly.
How to Update
To update BlendLuxCore, you need to first uninstall the current version and then install the new version as outlined in section Installation.
To uninstall:
- Open up the preferences menu: "Edit" -> "Preferences".
- Go to the "Get Extensions" tab.
- Click on the arrow to the right of the BlendLuxCore item to open up the actions menu.
- Click on "Uninstall".
Testing Experimental Versions
If you want to follow the latest development status, support development by testing new features, or you need an urgent bug-fix, then a few steps are necessary to use the latest versions.
What is important to understand in this context is the separation between "BlendLuxCore" and "LuxCore":
- LuxCore is the core library, written in C++, and distributed as "pyluxcore".
- BlendLuxCore is the interface between Blender and pyluxcore, written in python.
- The regular releases of BlendLuxCore will automatically download a specific, fixed version of pyluxcore.
- There is no automatic updating of either BlendLuxCore or pyluxcore, so that stability for production is not compromised.
- When using "latest" builds, both have to be installed separately
For the latest version of BlendLuxCore:
- download the "Latest" release in GitHub and install it following the instructions in How to Update and Installation.
- Note: This version will still install a (pre-configured) official release of pyluxcore, NOT its latest build.
To also get the latest version of pyluxcore:
- You will need an account on GitHub and log in.
- Go to the Actions page of the LuxCore repository.
- Click on the latest workflow run. If you are in doubt which one is suitable, please ask in one of the support or community channels.
- At the bottom of the page, you find the "Artifacts" section.
- Download the correct file for your operating system and the python version used by your Blender version. The python (minor-)version is indicated by the last number of the file name
- Example: "cibw-wheels-windows-latest-11" is for Windows and python 3.11 --> Python 3.11 is the version you need for Blender 4.X
- Unpack the zip-file you downloaded to get a .whl-file
- This file needs to be placed in a subfolder pyluxcore_custom/ inside the BlendLuxCore extension folder
- On Windows:
C:\Users\USERNAME\Appdata\Roaming\Blender Foundation\Blender\BLENDER_VERSION\extensions\user_default\BlendLuxCore\pyluxcore_custom\ - On Linux:
/home/USERNAME/.config/blender/BLENDER_VERSION/extensions/user_default/BlendLuxCore/pyluxcore_custom/ - on macOS:
/Users/USERNAME/Library/Application Support/Blender/BLENDER_VERSION/extensions/user_default/BlendLuxCore/pyluxcore_custom/
- On Windows:
- Note: there must only be one .whl file in the pyluxcore_custom/ folder at any time!
- When you empty the pyluxcore_custom/ folder, the pre-defined release version will be installed again.
Offline Installation
It is possible to install BlendLuxCore wihtout internet access, or in an environment where the regular installation method is blocked for network security reasons (i.e. some company networks).
In addition to the BlendLuxCore zip-file itself (see Downloading), you need to have the python-wheel of pyluxcore, and any further python-wheels that are dependencies, in the a appropriate version for your platform. For BlendLuxCore v2.10.0-alpha.2, these will be:
- pyluxcore-2.10.0a2
- numpy-2.2.4
- nvidia_cuda_nvrtc_cu12-12.8.93
You can search and download these manually from PyPi, or copy them from another computer where the installation was successful. In the latter case, you should find the files in the wheels/ subdirectory of the extension installaton path (see Testing Experimental Versions).
Once you have obtained the files, follow these steps:
- Install the addon as described in Installation. This will fail to import pyluxcore, as expected, but create the extensions directory required for the next steps.
In Blender, the BlendLuxCore addon will be shown as installed, but disabled. - Close Blender.
- Create a subdirectoy install_offline/ in the extension folder.
- Place the python-wheels in the install_offline/ subdirectory.
- Open Blender.
- Open the preferences menu, go to the Add-Ons tab.
- Activate BlendLuxCore by clicking the checkbox next to the BlendLuxCore item (see image).
- pyluxcore should now be installed. The install_offline/ directory will be deleted automatically if the installation was successful.
- Close and reopen Blender, and select LuxCoreRender as the rendering engine to verify that everythig works correctly.
Common Problems and Errors
Some fixes for common problems are listed in the FAQ.


