Difference between revisions of "LuxCoreRender Materials Car Paint"
m |
|||
| Line 7: | Line 7: | ||
== Presets == | == Presets == | ||
Presets are available for some quick paint jobs | Presets are available for some quick paint jobs. These are derived from the paper that the car paint material itself was based on. (You can read the paper [http://www.johannes-guenther.net/carpaint/ here]). The actual values used by the presets can be found [[LuxCoreRender Materials Car Paint Presets|here]]. | ||
<gallery mode="nolines" widths=200px heights=200px perrow=4> | <gallery mode="nolines" widths=200px heights=200px perrow=4> | ||
| Line 88: | Line 87: | ||
Here is an example of the settings for car paint - absorption color is black and depth is 0. | Here is an example of the settings for car paint - absorption color is black and depth is 0. | ||
Back to [[LuxCoreRender_Materials|Materials]] | |||
Revision as of 21:11, 18 December 2017

Car Paint is an advanced glossy material, simulating a diffuse surface with multiple reflective coatings. It works well for car paint, obviously, but is also well suited to any sort of "high-tech"-looking painted surface, such as painted aircraft skin, starships, futuristic weapons, etc.
Presets
Presets are available for some quick paint jobs. These are derived from the paper that the car paint material itself was based on. (You can read the paper here). The actual values used by the presets can be found here.
2k Akrylack
Blue
Blue Matte
BMW 339
Ford F8
Opel Titan
Polaris Silver
White


Parameters
The parameters may seem complicated at first, but when the basics are understood it's not that difficult. There are 12 parameters but you can group some of them so that you actually have only 6 (M1-3, R1-3, Spec col 1-3).
You work with three gloss "layers" in car paint and each layer has three parameters that can be controlled. In a nutshell, they are specular color (color/brightness) R (fresnel power) and M (roughness). For example the first layer's parameters are "Specular color 1", "R1", "M1". (note: "layer" is a bit of a misnomer, as they do not actually stack, they are merely chosen at random. But it will be used here as a term of convenience)
When setting up the gloss layers, you may find it easiest to "solo" each layer by turning the specular color on the other two layers to full black, allowing you to configure your M and R values for each layer one at a time. You will find that using higher values for M and R (such as R=.9, M=.2) produces a more "metallic" look for that layer, while lower values (such as R=.01, M=.02) produces a more "glassy" or "waxy" appearance.
"Diffuse color", "Absorption color" and "Absorption Depth" are general settings, that affect the whole material.
Diffuse Color
The diffuse color is the base color of the material. Try to not go above 0.8 as no color in the real world is that saturated/bright.
Specular Color
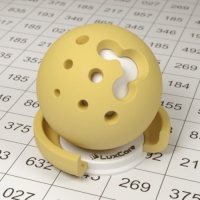
This controls the color and brightness of the reflections for each layer. When you set the specular color to green, the reflection of a gray object will appear green on the surface of your car paint. The reflection of a red object will appear yellow - the combination of red and green. With the help of a color wheel you can easily see the resulting color. Increasing the value of this color will result in that layer reflecting more light, producing a stronger reflection.

You can also mix the specular color by using different layers. In the image below the first and second layers have different values to show how they effect each other (the diffuse color of the material is gray). If both have the same value (the ball in the middle) you get a perfect mix (red + green = yellow). The left ball shows the red dominating (orange) and the right one green (bright green).
Note the mixing effect of the yellow sticks with the specular color of the ball can hardly be seen because every mixture of green and red includes a little yellow or is even total yellow.
R1-3
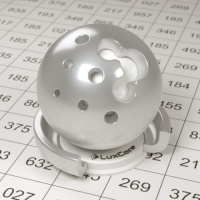
The R value controls the strength of the fresnel effect. With low R values, the reflection will only be near full strength when viewed from a very steep angle. At high values, it will be almost evenly distributed across the material.
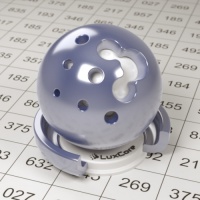
The image below illustrates the effect of raising all three R values together. Pay attention to the size of the dull area in the middle of the sphere, where it faces the camera head on.
Generally, you want to use a lower R value for your brightest, most glossy layer, and increase it for the duller layers. How much will depend on the paint you are simulating.
M1-3
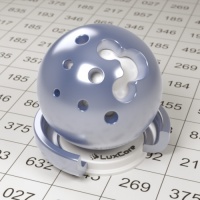
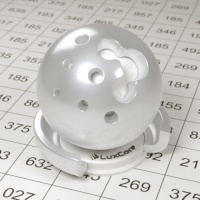
This one controls how strongly the reflections (which are set with R1-3) are scattered. It can be set between 0.0001 and 1.0. A value of 1.0 will make the reflections scatter the most (you will not be able to perceive the shape of anything in the reflections from the material).
ATTENTION!!: The minimum of this parameter is 0.0001! If you set it to 0.0 it will actually will be on maximum. It must have a value above 0.0! The Image below illustrates the effect.
Absorption Color and Depth
Color
Absorption means that the light which reaches the car paint is not reflected but "swallowed" by it. Assuming a color space consisting of red, green and blue and the laws of additive color mixing, there are some very interesting facts about car paint in LuxCoreRender.
todo: add a color wheel here
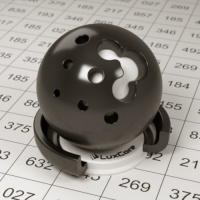
If you put a lamp into your scene with white light, this light is a perfect mixture of red, green and blue. When you give the absorption color of your car paint a value of red (left Ball in the image below) it will absorb the red component of the light from your white lamp. The effect you can see below might be confusing at first, but it's logical. Red is absorbed, and green and blue still reflect to the camera. The mixture of green and blue is cyan and that is what you see below. The ball in the middle has green as the absorption color and that means that a mixture of red and blue is still reaching the camera - hence the ball is magenta. For the right ball: absorption color = blue, so it appears red + green = yellow.
Depth
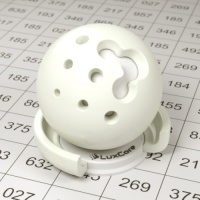
The absorption depth controls how far the light goes into the surface of your car paint before it is totally absorbed. When the depth is 0.0 the light is absorbed directly. That means among others, that the diffuse color of your car paint will disappear under the effect of your absorption settings. When you set a little depth, the diff color will shine through a little bit, like you can see below (the diffuse color is gray there). The absorption depth can have values between 0.0 and 15.0.
The image above is nearly the same as the first one. The values of absorption are the same and only the diffuse col has changed - to yellow. As you see the left ball is green with a little yellow shining through. But why green? Red is absorbed from the paint, so green and blue are left plus yellow from the diffuse color. Yellow and blue are complementary, which means they cancel each other - so only green is left.
But wouldn't that mean, that we should also have no yellow? Well, the reason why we still see that yellow touch is the value of the absorption depth. Remember, until the light reaches that depth it is not affected by the absorption, so not all of the diffuse color is affected.
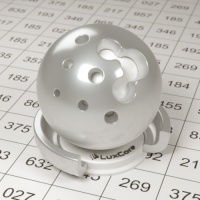
Example
Here is an example of the settings for car paint - absorption color is black and depth is 0.
Back to Materials