Difference between revisions of "Lighting"
(Created page with " ==Light Types== ===Area Lights and Mesh Lights=== The most common way of lighting in LuxCoreRender is by using area lights. With this light you are able to simulate a wide...") |
|||
| (11 intermediate revisions by 2 users not shown) | |||
| Line 1: | Line 1: | ||
===Area Lights and Mesh Lights=== | ===Area Lights and Mesh Lights=== | ||
The most common way of lighting in LuxCoreRender is by using area lights. With this light you are able to simulate a wide range of lighting. It supports common settings such as power, | The most common way of lighting in LuxCoreRender is by using area lights. With this light you are able to simulate a wide range of lighting. It supports common settings such as power and color but also allows to control the spread angle, as well as the shape of the emitted light using IES files. | ||
Another common way is by using mesh lights. This type of light supports the same features as area lights but also features textured lighting. As mesh lights are objects, you can assign an entire object to emit light, such as the tungsten filament in a light bulb or halogen bulb. In general, it's advised to use mesh lights with as few faces as possible to keep render times down. | |||
Objects only emit light in the direction that the normals of the object's faces are pointing. | |||
===Environment Lighting=== | |||
[[file:Lighting_environment_light.jpg|left|thumb|250px|Mirror material lit by a hemi lamp]] | |||
Environment lighting encloses the scene entirely, lighting it from all angles. It is normally used for environment mapping, although it can also be used to add a solid color environment. The hemi lamp is used for this type of lighting and it accepts latlong environment maps. | |||
Environment lighting is usually done with HDR(high dynamic range) images but it is possible to use low dynamic range images (like JPG or PNG) as well, but in this case you may want to add some additional lighting to your scene to avoid getting a poorly contrast render. This is not necessary with HDR environment maps, which can be used as the only source of light to create a realistic lighting. Note that the hemi lamp's location in the scene does not matter, only its rotation. | |||
<!--When using environment maps, using a gamma value of 1.0 (instead of the usual 2.2) is recommended. The exception to this is if you want the environment to look exactly like the map itself did in your image editor. This is probably not the case if you are using an actual HDR map. | |||
--> | |||
The [[External Resources|External Resources]] page has some links to sites that offer free and quality HDR's. Also a simple web search for "hdri maps" or "hdr maps" will give a lot of results. You can also create your own hdri maps with LuxCoreRender by using the [[LuxCoreRender_Cameras|environment/panorama camera.]] | |||
For more information on environment mapping, see the [[Environment_map|Environment map]] page | |||
<br clear="all"/> | |||
===Sun and Sky=== | |||
The sun and sky light creates a lighting setup that simulates the light of the sun and atmosphere, based on the direction of a sun light in the scene and a parameter named ''turbidity'' which defines the clearness of the sky. Both the sun angle and the sky clearness influence the color of the light. | |||
Note that the sun lamp is very bright (as it is in real life) so you may have to turn the Gain way down if you have other lights in the scene. The other lights may look like they are not even emitting, but they are actually overpowered by the sun. It is possible to use this light with sun only, sky only, or the default sun+sky. If you want softer shadows try adjusting the relative sun size parameter.<br/> | |||
Note that the sun lamp's location in the scene does not matter, only its rotation. | |||
<gallery mode="nolines" widths=250 heights=250> | |||
Lighting_sun_angle_1.jpg|Sun lamp angle 1 | |||
Lighting_sun_angle_2.jpg|Sun lamp angle 2 | |||
Lighting_sun_angle_2_+_higher_turbidity.jpg|Sun lamp angle 2 and higher turbidity | |||
</gallery> | |||
===Point Lights=== | |||
Point lights are infinitely small light sources that emit light in all directions. In most cases, it's recommended to use only mesh/area lights and environmental lighting for your scene, rather than point or spot lights. This is because the point and spot lights have no real world equivalent as the light source is an infinitely small point. As a result, they tend to produce unnaturally hard lighting and sharp shadows. | |||
===Spot Lights=== | ===Spot Lights=== | ||
Spot lights are infinitely small lights that emit light in a cone shape. Apart from color and location, the width of the cone can be set (as the number of degrees of the center line it will extend), and there is a setting to feather the intensity towards the edge. | Spot lights are infinitely small lights that emit light in a cone shape. Apart from color and location, the width of the cone can be set (as the number of degrees of the center line it will extend), and there is a setting to feather the intensity towards the edge. | ||
As with the point lights, it's recommended to use only mesh/area lights and environmental lighting. This is because the point and spot lights have no real world equivalent as the light source is an infinitely small point. | |||
'''Projector''' | |||
Both point lights and spot lights can distribute their light and color according to an image. With spot lights, this results in an effect like something being projected from a diapositive projector or beamer. With point lights, the image map is spherically mapped. <-- check if this works in luxcore | |||
===IES data=== | |||
With the help of IES files you can get the light distribution pattern of a real light fixture. This will keep render times down as you don't need a reflector or glass material to replicate the pattern. The renders below were lit with the same area light, only with different IES files. Area lights, spot and point lights supports IES files. Some links to available IES files can be found on the [[External Resources#IES lighting files|external resources page]] and more information about IES files and how to create your own can be found here: [[Lighting_With_IES_Files]] | |||
== | <gallery mode="nolines" widths=200px heights=200px> | ||
Lighting_IES_example_1.jpg | |||
Lighting_IES_example_4.jpg | |||
Lighting_IES_example_2.jpg | |||
Lighting_IES_example_3.jpg | |||
</gallery> | |||
<br clear="all" /> | <br clear="all" /> | ||
<!-- | |||
===Color and Spectrum=== | |||
LuxRender calculates light colors using actual spectral data (is that true for luxcore too? ). When using an RGB color as input, LuxRender will generate a physically plausible spectrum based on the desired color. The implementation is based on a [http://www.cs.utah.edu/~bes/papers/color/ paper by Brian Smits]. | |||
[http://www. | |||
However, you can also define a spectrum for the light source in a variety of ways, using spectrum textures. For more information, see [[LuxCoreRender Textures Spectrum]] | |||
--> | |||
[[LuxCoreRender User%27s Manual|Back to LuxCoreRender User's Manual]] | |||
Latest revision as of 11:13, 15 April 2018
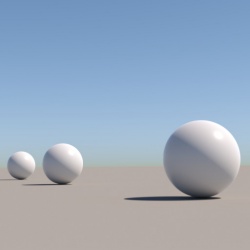
Area Lights and Mesh Lights
The most common way of lighting in LuxCoreRender is by using area lights. With this light you are able to simulate a wide range of lighting. It supports common settings such as power and color but also allows to control the spread angle, as well as the shape of the emitted light using IES files.
Another common way is by using mesh lights. This type of light supports the same features as area lights but also features textured lighting. As mesh lights are objects, you can assign an entire object to emit light, such as the tungsten filament in a light bulb or halogen bulb. In general, it's advised to use mesh lights with as few faces as possible to keep render times down.
Objects only emit light in the direction that the normals of the object's faces are pointing.
Environment Lighting

Environment lighting encloses the scene entirely, lighting it from all angles. It is normally used for environment mapping, although it can also be used to add a solid color environment. The hemi lamp is used for this type of lighting and it accepts latlong environment maps.
Environment lighting is usually done with HDR(high dynamic range) images but it is possible to use low dynamic range images (like JPG or PNG) as well, but in this case you may want to add some additional lighting to your scene to avoid getting a poorly contrast render. This is not necessary with HDR environment maps, which can be used as the only source of light to create a realistic lighting. Note that the hemi lamp's location in the scene does not matter, only its rotation.
The External Resources page has some links to sites that offer free and quality HDR's. Also a simple web search for "hdri maps" or "hdr maps" will give a lot of results. You can also create your own hdri maps with LuxCoreRender by using the environment/panorama camera.
For more information on environment mapping, see the Environment map page
Sun and Sky
The sun and sky light creates a lighting setup that simulates the light of the sun and atmosphere, based on the direction of a sun light in the scene and a parameter named turbidity which defines the clearness of the sky. Both the sun angle and the sky clearness influence the color of the light.
Note that the sun lamp is very bright (as it is in real life) so you may have to turn the Gain way down if you have other lights in the scene. The other lights may look like they are not even emitting, but they are actually overpowered by the sun. It is possible to use this light with sun only, sky only, or the default sun+sky. If you want softer shadows try adjusting the relative sun size parameter.
Note that the sun lamp's location in the scene does not matter, only its rotation.
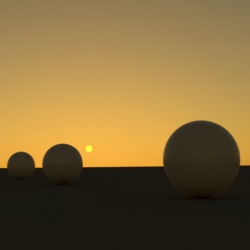
Sun lamp angle 1
Sun lamp angle 2
Sun lamp angle 2 and higher turbidity


Point Lights
Point lights are infinitely small light sources that emit light in all directions. In most cases, it's recommended to use only mesh/area lights and environmental lighting for your scene, rather than point or spot lights. This is because the point and spot lights have no real world equivalent as the light source is an infinitely small point. As a result, they tend to produce unnaturally hard lighting and sharp shadows.
Spot Lights
Spot lights are infinitely small lights that emit light in a cone shape. Apart from color and location, the width of the cone can be set (as the number of degrees of the center line it will extend), and there is a setting to feather the intensity towards the edge.
As with the point lights, it's recommended to use only mesh/area lights and environmental lighting. This is because the point and spot lights have no real world equivalent as the light source is an infinitely small point.
Projector
Both point lights and spot lights can distribute their light and color according to an image. With spot lights, this results in an effect like something being projected from a diapositive projector or beamer. With point lights, the image map is spherically mapped. <-- check if this works in luxcore
IES data
With the help of IES files you can get the light distribution pattern of a real light fixture. This will keep render times down as you don't need a reflector or glass material to replicate the pattern. The renders below were lit with the same area light, only with different IES files. Area lights, spot and point lights supports IES files. Some links to available IES files can be found on the external resources page and more information about IES files and how to create your own can be found here: Lighting_With_IES_Files


